

Three-point lighting stands as the foundation of professional video production, a technique developed decades ago in Hollywood studios that remains just as relevant today for YouTube creators, TikTok influencers, and professional videographers. Understanding and mastering this fundamental lighting setup separates amateur-looking content from professional productions, regardless of your camera quality or budget. This comprehensive guide breaks down three-point lighting into digestible concepts that any beginner can implement immediately to transform their video quality.
What Is Three-Point Lighting?
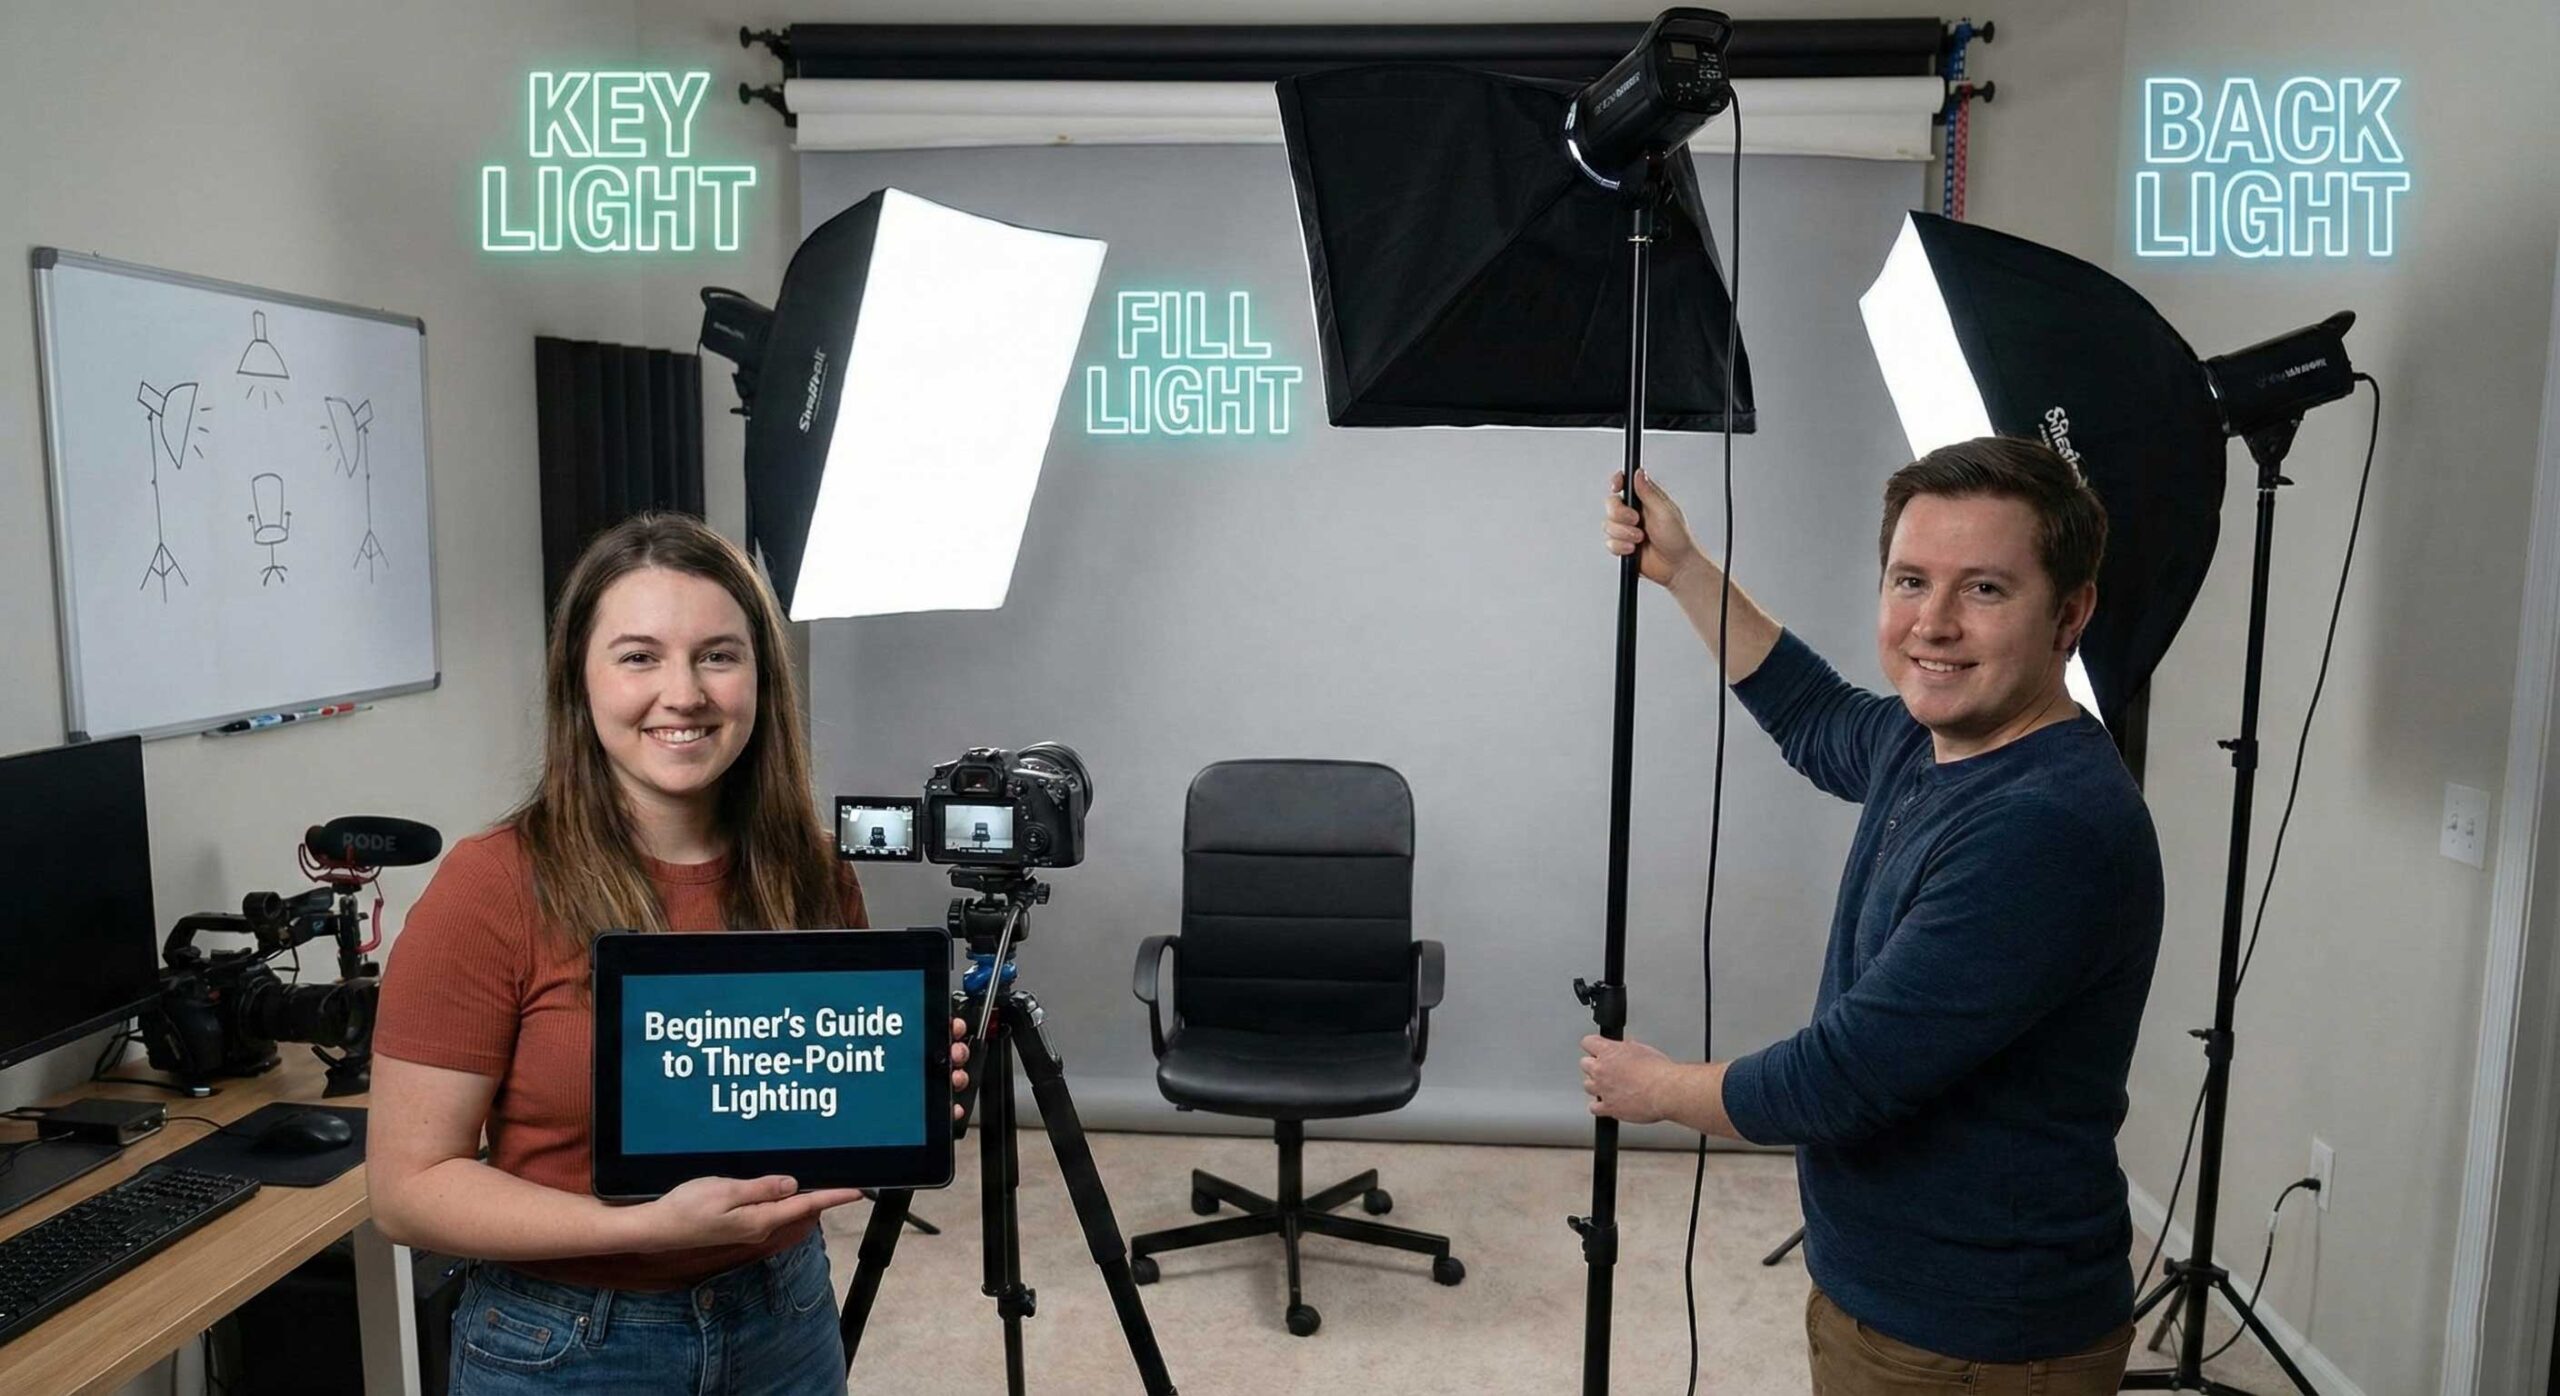
Three-point lighting is a standard method used in visual media to illuminate a subject from three distinct positions, creating depth, dimension, and professional-looking results. The technique uses three separate light sources positioned strategically around your subject: a key light, a fill light, and a back light. Each light serves a specific purpose, and understanding these roles is crucial to implementing the technique effectively.
The beauty of three-point lighting lies in its simplicity and effectiveness. While professional cinematographers may use dozens of lights on high-budget productions, three strategically placed lights can achieve remarkable results that satisfy most content creation needs. This approach provides a repeatable formula that works across different subjects, locations, and content types.
The Key Light: Your Primary Light Source
The key light serves as your main light source and typically provides the brightest, most direct illumination on your subject. It establishes the overall look and feel of your lighting setup, and all other lights work in relation to it.
Positioning Your Key Light
Place your key light at approximately 45 degrees to one side of your camera and slightly above your subject’s eye level. This angle creates natural-looking shadows that add dimension to faces without being harsh or unflattering. The 45-degree angle mimics how we typically encounter light in real-world situations—from windows, lamps, or the sun—making the lighting feel instinctive and natural to viewers.
The height of your key light matters significantly. Position it too low, and you create an unsettling “horror movie” effect with shadows pointing upward. Too high, and you get unflattering shadows under the eyes and nose. Aim for 30-45 degrees above eye level as a starting point, then adjust based on your subject’s facial features and the mood you want to create.
Choosing the Right Key Light
Your key light should be your most powerful light source, providing sufficient brightness to properly expose your subject. The YanBeam CT 450 Bi makes an excellent key light choice for beginners and professionals alike. Its bi-color functionality allows you to match different shooting environments, whether you’re filming near windows during daytime or in interior spaces with warm artificial lighting. The adjustable output gives you control over intensity without needing to physically move the light closer or farther away.
For creators working in smaller spaces or with tighter budgets, the YanBeam CT 250 bi provides similar bi-color versatility in a more compact form factor. Don’t let the smaller size fool you—proper positioning matters more than raw power for most content creation scenarios.
The Fill Light: Softening Shadows
The fill light serves to soften or eliminate the shadows created by your key light. Without a fill light, the shadow side of your subject’s face would appear very dark, creating a dramatic, high-contrast look that works for some content but appears too harsh for most applications.
Positioning Your Fill Light
Place your fill light on the opposite side of your camera from your key light, typically at a similar 45-degree angle but at the same height as your camera or slightly below. This position allows it to “fill in” the shadows created by the key light without creating competing shadows of its own.
The fill light should always be less bright than your key light. A common starting ratio is 2:1, meaning your key light is twice as bright as your fill light. This maintains some shadow for depth and dimension while preventing the harsh contrast that occurs without fill lighting.
Selecting Fill Light Equipment
Your fill light doesn’t need to be as powerful as your key light since you’ll typically run it at lower intensity anyway. The YanBeam Softlight SL360 BI works beautifully as a fill light because its soft, diffused output naturally creates gentle shadow fill without harsh edges. The bi-color capability ensures it matches your key light’s color temperature perfectly, maintaining natural-looking skin tones.
Some creators use reflectors instead of powered fill lights, bouncing light from the key light back onto the shadow side of the subject. This approach works well for budget-conscious creators, though it provides less control than a dedicated fill light.
The Back Light: Creating Separation
The back light, sometimes called a rim light or hair light, illuminates your subject from behind, creating separation between the subject and background. This separation is what gives professional videos that polished, three-dimensional look where subjects appear to “pop” off the screen rather than blending into their backgrounds.
Positioning Your Back Light
Place your back light behind your subject, typically opposite your camera position and elevated above the subject’s head, angled downward. The goal is to create a subtle highlight along the shoulders, hair, or top of the head without creating visible lens flare or appearing directly in your shot.
The back light should be roughly the same brightness as your key light or slightly brighter. Unlike the fill light, which should be softer, your back light can be more focused and intense since it’s creating an accent rather than primary illumination.
Back Light Equipment Considerations
Any light can serve as a back light, though adjustable brightness is valuable for fine-tuning the separation effect. Smaller, more compact lights often work well for back lighting since they’re easier to position behind subjects without appearing in the frame. RGB lights like the YanBeam RGB Flatlight RS20 can serve as creative back lights, allowing you to add subtle color accents that enhance your visual style while still providing separation.
Understanding the Lighting Ratio
The relationship between your lights’ brightness determines the overall mood and style of your lighting. A high ratio (where your key light is much brighter than your fill) creates dramatic, moody lighting with pronounced shadows. A low ratio (where key and fill are closer in brightness) creates flat, even lighting that’s very safe but potentially less interesting.
For most content creation purposes, a 2:1 or 3:1 ratio works well. This means your key light is two to three times brighter than your fill light. This ratio provides enough shadow to create dimension and visual interest while keeping shadows soft enough to remain flattering.
Experiment with different ratios to find what works for your content type and personal style. Beauty content often uses lower ratios for very even, flattering lighting. Dramatic content or interviews might use higher ratios for more mood and atmosphere.
Common Three-Point Lighting Mistakes
Mistake 1: Positioning Lights Too Close
Beginners often place lights too close to their subjects, creating harsh shadows with hard edges and hot spots where the light is too intense. Start with your lights farther away than seems necessary, then move them closer only if needed. Quality lights provide enough output to work effectively even at several feet distance, giving you flexibility in positioning.
Mistake 2: Matching Brightness Levels Incorrectly
Your three lights should have different brightness levels—that’s the entire point of the setup. New creators sometimes make all three lights equally bright, creating flat, directionless lighting that looks amateur. Remember: key light brightest, back light similar to key, fill light softer.
Mistake 3: Ignoring Color Temperature
All your lights must be set to the same color temperature unless you’re deliberately creating a specific effect. Mixing warm and cool lights creates unnatural skin tones that viewers find subconsciously unappealing. This is why bi-color lights are so valuable—you can easily match all lights to the same Kelvin setting.
Mistake 4: Forgetting to Adjust for Different Subjects
Three-point lighting isn’t one-size-fits-all. Different facial features, skin tones, and even clothing colors require subtle adjustments to achieve optimal results. What works perfectly for one person might need tweaking for another. Always look at your camera’s viewfinder or monitor rather than trusting how the lighting looks to your eyes.
Modifying Three-Point Lighting for Different Content
Interviews and Talking Head Videos
For interview-style content where your subject speaks directly to the camera, classic three-point lighting works perfectly as described. Focus on flattering skin tones and creating enough separation to keep viewers’ attention on the speaker rather than the background.
Product Reviews and Demonstrations
When demonstrating products, you may need to adjust your lighting to ensure both your face and the products you’re showing receive adequate illumination. Consider adding a fourth light specifically for products, or position your key light higher so it illuminates both you and a table surface where you’ll display items.
Movement and Performance Content
For content involving movement—fitness videos, dance content, cooking demonstrations—you need to ensure your lighting covers your entire performance area rather than just a single spot. This might mean using more powerful lights positioned farther back, or adding additional lights to expand your well-lit area.
Building Your Setup Gradually
You don’t need to purchase all three lights simultaneously to benefit from three-point lighting principles. Many successful creators built their setups gradually, starting with a single key light and adding fill and back lights as their content and income grew.
Starting with One Light
If you can only afford one light initially, make it a quality key light. The YanBeam CT 250 bi provides the versatility and output needed to serve as an excellent foundation. Use window light or a simple reflector as your fill light, and skip the back light temporarily. Even single-light setups following three-point lighting principles produce better results than random light placement.
Adding the Second Light
Your second light should typically be your fill light, as this makes the biggest immediate impact on your content quality. The jump from single-light to key-plus-fill lighting dramatically improves how professional your videos appear. The YanBeam Softlight SL360 BI complements harder key lights perfectly with its naturally soft output.
Completing with the Third Light
The back light provides the final professional touch, creating that separation that makes your content look truly polished. This can be your third purchase, or you might choose to add a back light before a dedicated fill if you have good natural fill lighting from windows or light-colored walls.
Advanced Three-Point Lighting Techniques
Varying the Setup for Different Moods
Once you’ve mastered basic three-point lighting, experiment with variations to create different moods. Place your key light more to the side (closer to 90 degrees rather than 45) for more dramatic shadows. Lower your fill light intensity for moodier atmospheres. Raise your back light intensity to create more pronounced rim lighting.
Using Colored Back Lights
While your key and fill lights should generally produce natural white light for accurate skin tones, your back light offers opportunities for creative color without affecting how your subject looks. Adding subtle color accents can enhance your visual style—perhaps a cool blue for tech content or warm amber for cozy lifestyle videos.
Controlling Light Spill
As you refine your technique, pay attention to where your lights are pointing beyond just your subject. Light spilling onto backgrounds can create unwanted hot spots or eliminate the shadow separation you’ve worked to create. Use barn doors, flags, or simply careful positioning to control exactly what each light illuminates.
Adapting Three-Point Lighting to Your Space
Small Spaces
Not everyone has large studios with room for lights positioned far from subjects. In smaller spaces, you may need to use less powerful lights or dim your lights more to avoid overexposure. The adjustability of bi-color lights becomes crucial here, allowing you to dial in appropriate brightness for tight quarters.
Unusual Room Shapes
Rooms with strange layouts, pillars, or limited access to certain angles might prevent perfect 45-degree positioning. That’s okay—three-point lighting principles still apply even if you can’t achieve textbook positioning. Focus on the concept: one main light, one fill light, one separation light. The specific angles matter less than understanding each light’s purpose.
Dealing with Windows
Windows can be blessings or challenges depending on the time of day and your control over them. If you can’t control window light with curtains or shades, position your setup so windows act as one of your three lights, then add artificial lights to complete the setup. Bi-color capability lets you match natural daylight color temperature perfectly.
Measuring Your Success
How do you know if your three-point lighting setup is working? Look for these signs in your footage:
Your subject should have visible dimension with gentle shadows that add depth without being harsh. There should be clear separation between subject and background—your subject should “pop” rather than blend in. Skin tones should look natural and flattering, without strange color casts or overly flat appearance. The overall image should look polished and professional, drawing viewers’ attention to your content rather than technical issues.
Record test footage and watch it on different devices—your camera’s small screen might not reveal issues that become obvious on a larger monitor or television.
Practice and Refinement
Mastering three-point lighting takes practice. Your first attempts might not look perfect, and that’s completely normal. The key is understanding the principles and applying them consistently while paying attention to results.
Take before and after photos as you implement three-point lighting. The improvement will likely be dramatic and will motivate you to continue refining your technique. Watch professional content you admire and try to identify how they’ve used lighting to create specific effects. You’ll start noticing lighting in everything you watch, which accelerates your learning.
Conclusion
Three-point lighting represents the foundation of professional video production for good reason—it works. This time-tested technique creates depth, dimension, and visual polish that separates amateur content from professional productions. While the setup involves three separate lights, the principles are straightforward: one main light, one fill light to soften shadows, and one back light to create separation.
Starting with quality, adjustable lights provides the flexibility to implement three-point lighting effectively while leaving room to grow your technique over time. The YanBeam CT 450 Bi serves as an excellent key light, the YanBeam Softlight SL360 BI works beautifully for fill, and creative options like the YanBeam RGB Flatlight RS20 can add both separation and subtle color enhancement as back lights.
Remember that rules in lighting are guidelines rather than restrictions. Once you understand why three-point lighting works, you can modify it to suit your specific needs, space constraints, and creative vision. The goal isn’t perfection on your first try—it’s understanding the principles and consistently applying them to create better content.
As you implement three-point lighting in your content creation, you’ll find it becomes second nature. The dramatic improvement in your video quality will be obvious to your audience, even if they can’t articulate exactly what changed. That’s the power of professional lighting techniques—they create subconscious feelings of quality and credibility that build trust and engagement with your viewers. Master three-point lighting, and you’ve mastered the foundation of professional video production.